Woven Shibori on a Rigid-Heddle Loom

Shibori is a traditional Japanese technique in which you stitch a cloth with a thread and then pull the thread tight to create a resist, similar to tie-dyeing.
Woven shibori (popularized by Catherine Ellis and Kay Faulkner) adds the thread into the cloth as it is woven, eliminating the need for stitching. Although woven shibori is typically created on a loom with four or more shafts, you can—with a bit of ingenuity—weave shibori on a rigid-heddle loom.
My weaving career had spanned all of six months when I attended a workshop taught by Syne Mitchell. One of the looms I brought to class was a rigid-heddle loom dressed with a skein of wool. Inspired by Catherine Ellis' book, Woven Shibori, I wanted to create a simple plainweave scarf with pick-up shibori to add design interest.
Syne showed me how to use the patterning technique illustrated by Betty Davenport in her book Textures and Patterns for the Rigid-Heddle Loom to simplify the pick-up process.
One of my first challenges was finding an appropriate thread to use as the supplemental weft (the thread you pull tight to create the resist patterning.) I had started the project using nylon upholstery sewing thread, but it was very thin; and I worried that when it came time to pull the thread tight, it might cut my hands or the cloth, or snap. Everything I found in local shops was too thick, too thin, or too absorbent. And so, my Shibori project languished in the closet for several months.
Then I discovered Omega nylon crochet thread, size 2. It was perfect for my shibori resist thread: super strong, slick, and not too thin.
Project Details
This fun and portable project is quick to weave! With woven shibori you can create nearly endless patterns. You can pick-up a regular repeat at given intervals, or play around and create organic designs with freeform pickup.
Equipment
- Rigid-heddle loom (Pictured in this article is a Harrisville Designs Easy Weaver B.)
- Dyes (the ones used for this project are Mother MacKenzie's Miracle Dyes.)
- Crockpot or dyepot (dedicated to dyeing only.)
- Various dyeing supplies: plastic gloves, spoon, etc.
Yarn
- Lion Brand® Fishermen's 100% wool (cloth warp and weft)
- Omega brand nylon crochet thread, size 2 (supplemental weft)
I wound a warp of 88 ends, each 92 inches long.
Sett
8 ends per inch
Dimensions
11 inches wide in the reed, 92 inches long.
The finished scarf measured 9 x 66 inches, plus another 6 inches for fringe.
Weave Structure
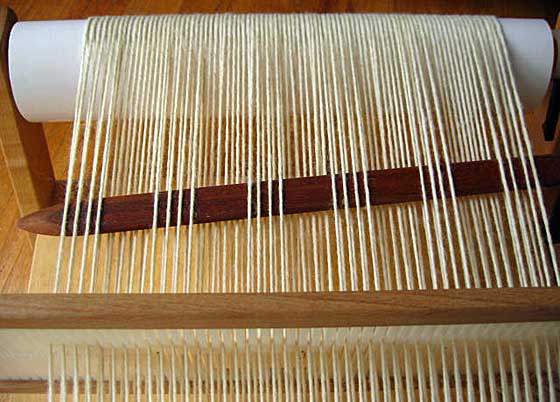
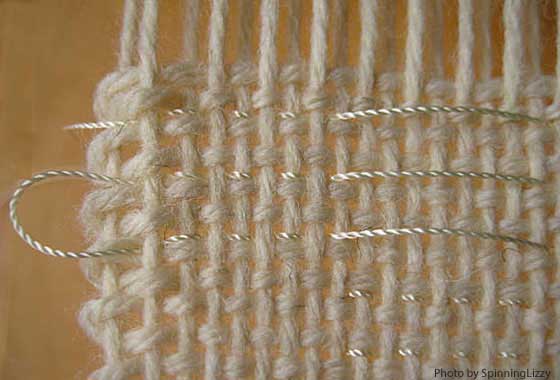
With the rigid heddle in the down position—so I was only picking up slot threads—I used a pick-up stick to select an under-four, over-four pattern, repeating this across.
Weaving
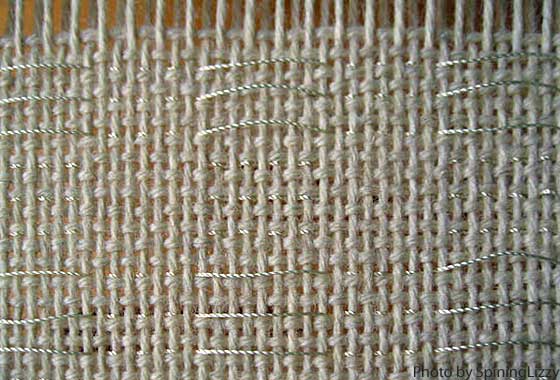
The shibori pattern in this project is created by weaving a section of plain weave, then pattern A, another section of plain weave, and then pattern B.
The two patterns are woven as follows:
Pattern A
- Put the rigid heddle in the neutral position.
- Bring the pickup stick forward and turn it on edge to create the shed.
- Weave with the supplemental weft (aka pattern thread.)
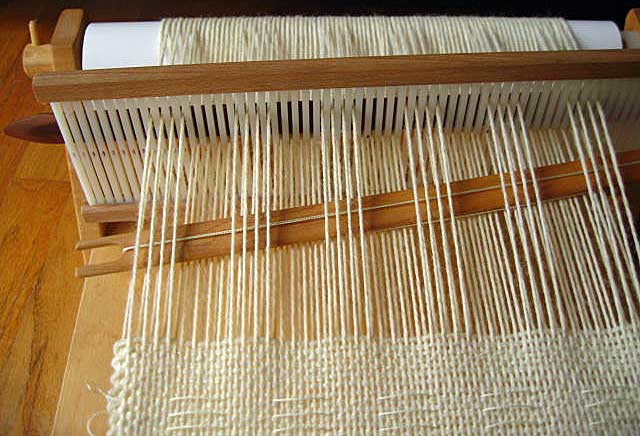
Pattern B
- Put the rigid heddle in the up position.
- Slide the pickup stick forward through the warp threads until its edge touches the rigid heddle to create the shed. (This time you leave the stick laying flat, you do not turn it on edge.)
- Weave the supplemental weft through the shed created on the underside of the warp.
To begin your scarf, weave a header to spread the warp, and then two inches of plainweave.
Weave the body of the body of your scarf, alternating the two patterns between sections of plainweave as follows:
1. Weave one shot of pattern A, using the nylon thread.
2. Weave two shots of plainweave using the wool weft.
3. Repeat steps 1 and 2 two more times.
4. Weave one shot of pattern B, using nylon thread.
5. Weave two shots of plainweave using wool weft.
6. Repeat steps 4 and 5 two more times.
Finish with two inches of plainweave.
Steps 2 and 5 create the plainweave ground cloth that is left behind to form the scarf after the nylon resist threading has been removed.
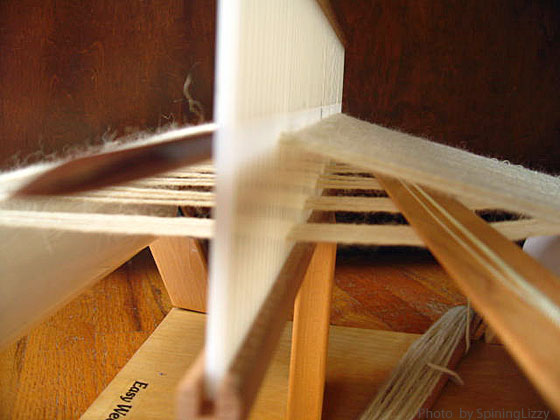
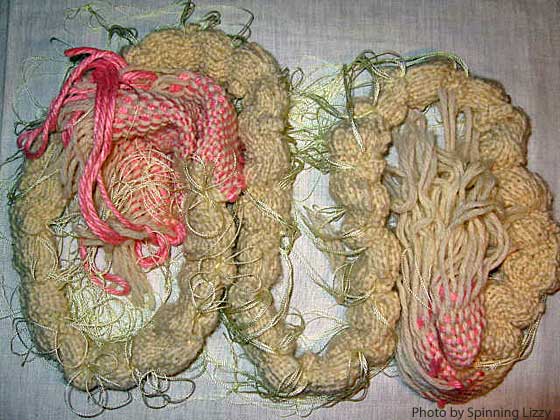
As you weave, be sure to leave loops of the supplemental warp on one or both selvedges. You'll pull these to cinch in the warp before dyeing. Having loops you can get your finger into makes this easier.
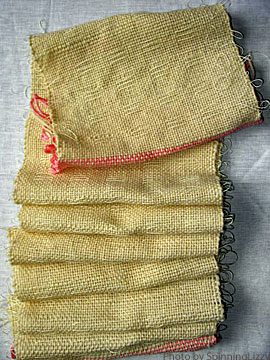 |
The top of the scarf was folded over in the picture to the left; you can see that the pickup pattern on the back mimics the pattern on the front. |
Dyeing
 |
I used gloves and plastic sticks to help me cinch in the nylon resist threads. It's a time-consuming chore, but as Catharine Ellis points out in her book, it's also a portable one; I finished mine outdoors while enjoying the sun and watching my son play. |
I pulled as hard as I could, then pulled again even harder, and knotted the ends using surgeon's knots.
I weighed the scarf to determine the weight of the dry wool and calculated the amount of dye to use, then put it into a tub of warm soapy water to soak for two hours.
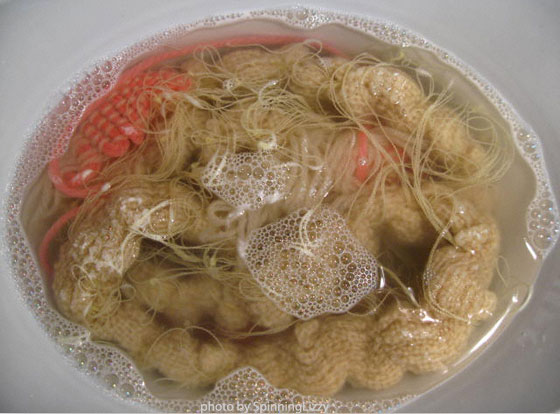
After soaking, the scarf went into a heated crock pot filled with just enough hot water to cover the cloth. Then I poured on the dyes, from lightest to darkest, using a mix of worker blue and worker black to replicate the indigo blue of traditional shibori. The result looked like mud, not my envisioned variegated colour progressions. I covered the crock pot and heat-set the dye for an hour, I returned to find... heat-set mud!
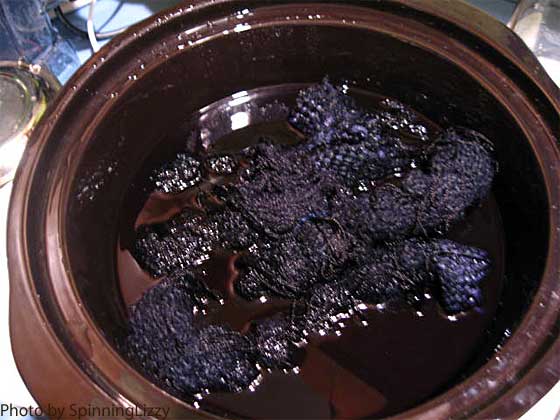
After the scarf had cooled, I rinsed it in tepid water until the water ran clear, then squeezed the excess water out and hung up the cloth to dry.
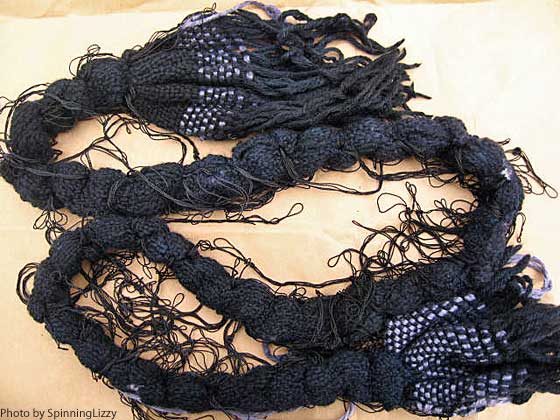
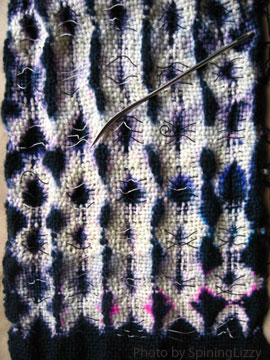
I used a large upholstery needle to carefully pick open the knots. I was surprised that the nylon thread had been dyed along with the wool, and worried that I would open up the scarf to find it completely blackened.
 To my delight, not only did my scarf have plenty of undyed areas, but it was a happy surprise to discover how shibori can transform simple plainweave into something fluid, organic, and elegant. I even loved the pleats that the resist threads left in the scarf, although I knew they would be gone after I wet finished the cloth.
[Editor's Note: You can preserve the shibori pleat by not washing the fabric again after the dyeing process. Such a garment would be dryclean only.]
I carefully removed the nylon resist threading in long lengths, as it had been beautifully dyed and might find another life in another project. It was a bonus to discover acid dyes work on nylon, although I've discovered after completing this project that it wasn't necessary to use a nylon thread; any strong cotton thread would work. After all the nylon threads were removed, I washed the scarf again, using hot water and a sink plunger to slightly full the scarf.
This project represents many firsts for me. Not only is it my first attempt at Shibori, but it's also my first time weaving on this loom, the first time I didn't fuss with selvedges, my first time dyeing on my own, and even the first time I completed a woven project from beginning to end (in this case, twisting and trimming the ends, then wet finishing it).
I had a lot of fun using my sweet, portable, rigid-heddle loom, and will plan to keep a similar project ready to go at all times, perhaps in my car, so I can weave on those times when I’m waiting to pick up my son, or during impromptu trips. I'm definitely over my dyeing-on-my-own jitters, and I didn't anticipate the inordinate pleasure a finished scarf would give me.
As for Shibori, I'm completely smitten, and predict a new obsession.
Elizabeth Lee, aka SpinningLizzy, didn’t know what she was getting into when she started knitting a few years ago. She fell down the slippery fibre slope from knitting, to spinning, and most recently, to weaving. It has taken less than a year for her very small home to be overtaken by more than a dozen looms. Some of her adventures may be found on her blog, SpinningLizzy.